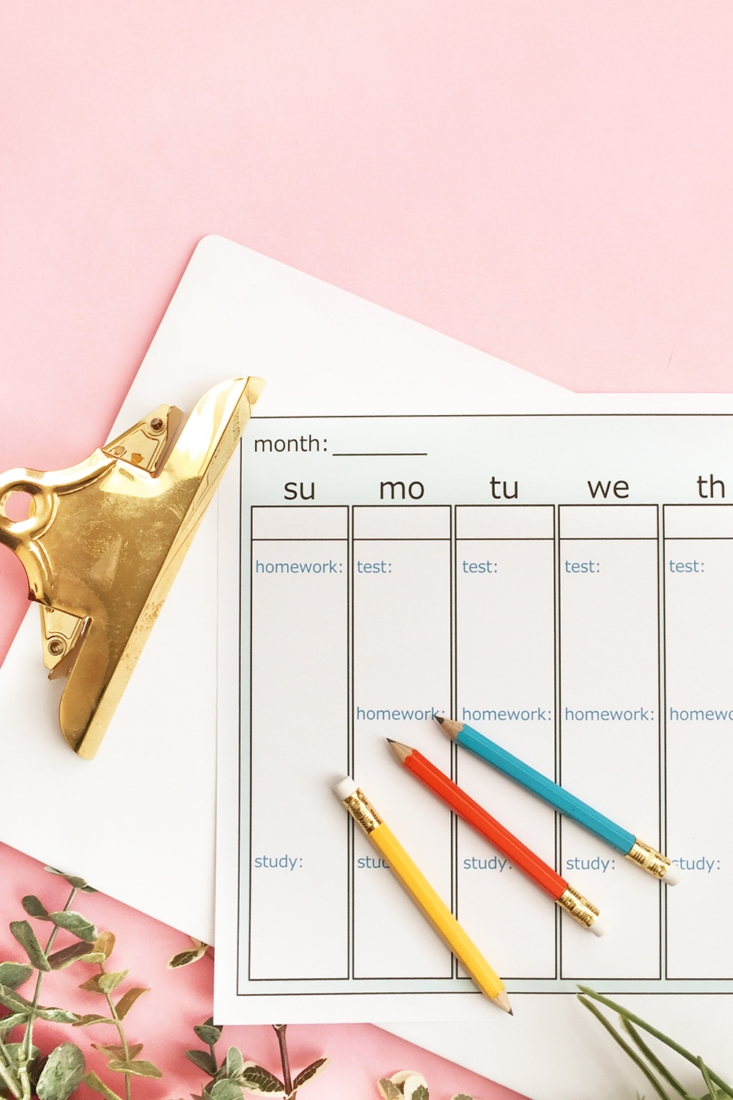
My older son is in middle school and we had a little meltdown last week with the amount of homework and tests he had. He felt completely overwhelmed and it came to me that he needed help with managing his time. He needed a way to visually plan his assignments, plan what to study, plan when to study, and so on. Last weekend, I decided that we needed a weekly planner that focused on all these things. We needed something that will be kept as a live document throughout the week, and I came up with this one. How did I design it? With Silhouette Studio! I love it so much. We have used it for a week now and my sweet son is not stressed at all this week. What I love is that now I have a template that I can edit and that I can use for any kind of planning. Would you like to see how I did mine? Read on for the full tutorial!
*This post contains affiliate links for products that I use and love!
What Is Silhouette Studio?
As you know, I use Silhouette Studio for many, many projects, so I thought I’d share this information as a quick review of the software, which will hopefully answer any questions you may have before downloading and using it to design your own weekly planner.
The Silhouette Studio software is the design software that helps you design, create and make projects that you can send to your Silhouette Cutting Machine. For this project, I am not using a machine – just the software. You can find and download the Silhouette Studio software at silhouetteamerica.com/software. The Silhouette Studio Basic Edition is the free version you can download and use for making, editing and printing your own designs and ones from the Silhouette Design Store. There are different versions of the software that you can pay for. You can see the comparisons here.
If you are cutting your designs by hand or making a printable like this project, you should set the line thickness of the designs to anything greater than 0 to see the design printed.
Materials To Design A Weekly Planner
- Silhouette Studio (there is a free version!)
- Printer
- Printer paper
How To Design A Weekly Planner
With Silhouette Studio
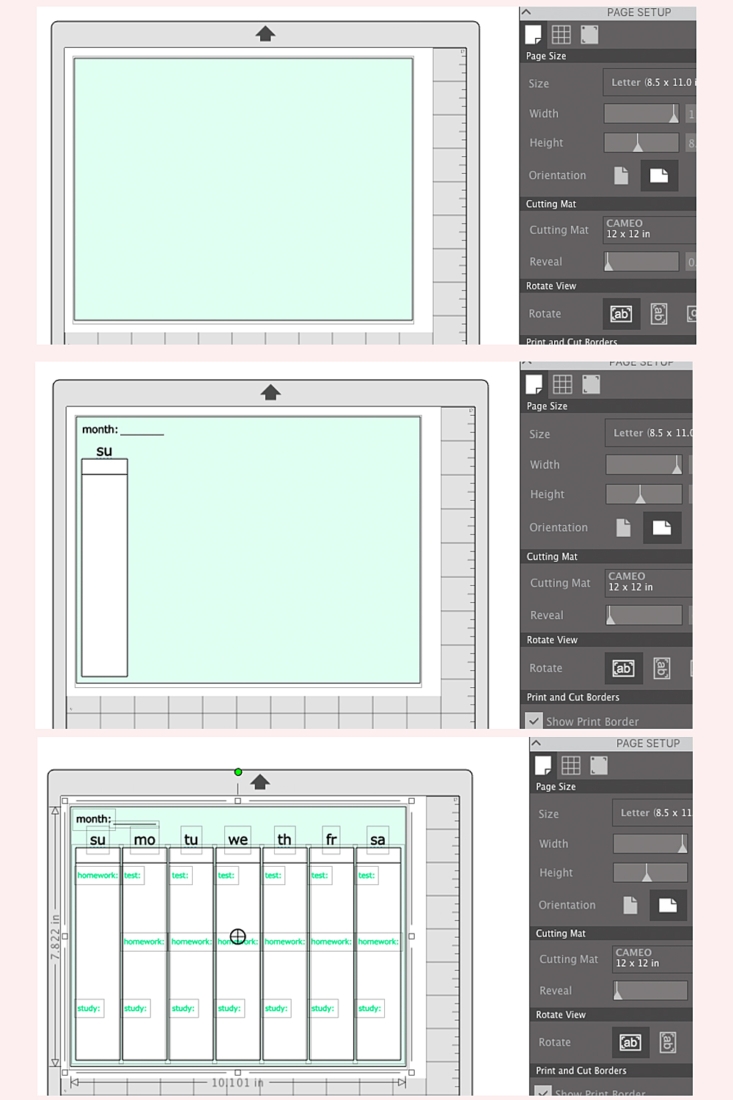
Step 1: Create A Background
- Open Silhouette Studio
- Set Your Page Orientation to Landscape
- Show the Print Border
- Create a rectangle the same size as the Print Border
- Fill your rectangle with color. If you want a black border around the rectangle, set its line thickness to anything above 0 and change the line color to black
Step 2: Create Your Headers
- For my design, I decided to put a month header at the top using the text tool (changing the line and fill colors to black)
- Use the line tool to create a space to write the month
- Now use the text tool (changing the line and fill colors to black) to create the days of the week
Step 3: Create Your Day Columns
Create a rectangle for each day of the week. My dimensions for each are 1.3 in wide by 6.4 in long. I chose this size so that all 7 columns for each day of the week can fit in the page
For each rectangle or day column:
- Fill it with white color
- Change the line thickness to anything above 0
- Change the line color to black
- Optional: Use the line tool to create the bottom of the box at the top of the column. I used this box to put the date of that day
- Also Optional: Add text that will make certain deliverables that you or your student will meet each week. In my case, I added areas to write my son’s homework assignments, any upcoming tests and study opportunities
Step 4: Put Everything Together
Now that we have all our design elements, it’s time to put everything together for our weekly planner. Align your days of the week to the center of day columns. Move the text around to your liking, etc. Remember that this is a living template. You can change the colors and layout as needed.
Tip: Try printing a sample on printer paper first to make sure that the size, content and colors meet your expectations
Once you are happy with your design, send it to print and start filling it out!
And there you have it. You have just designed your own weekly planner! My son used it all week and we have had it hung up on our magnetic bulletin board so that we can see the progress of the week. So far it’s been a good tool for his time management. How will you use your planner to stay organized?
Looking for some more fun and DIY inspiration? Take a look at some of my Home Decor DIY Tutorials and craft a little longer with me!
What an awesome way to keep school-aged kids organized!!!
Thanks, Theresa! xoxoxo