Hello! Hope you are all having a great weekend. It’s been sunny and warm here in our corner of Maryland – a nice winter break, if you will. Fingers and toes crossed for no snow days this week! My Canadian friends are rolling their eyes as they read this, and rightly so.
I’m pretty sure there are different varieties of this project, but in case you have not seen any, here is a fun and easy way to dress up a paper bag and coordinate them with tags. I usually buy these bags in various sizes and colors to tuck away in my craft stash. When an event pops up, I just whip them out and arm myself with paper punches.
Side note: I recently purchased the Martha Stewart Crafts Circle Edge Punch Starter Kit, and needed an excuse to try it out. It uses an amazing magnetic mechanism (read: magic!) to cut out your shape. The kit comes with a punch cartridge, so all you need is some paper, and you’re set.
The What
[row] [span columns=”5″] [/span] [span columns=”5″] [/span] [/row]
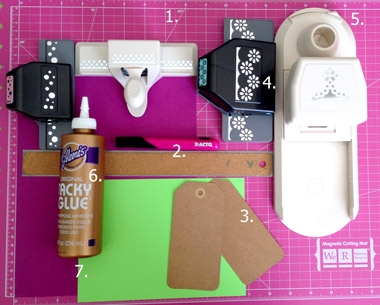
- Cutting Mat
- Craft knife and ruler (paper trimmer or scissors can be used also)
- Tags
- Border Punch
- Circle Edge Punch and Punch Cartridge (all of these are in the kit I used)
- Glue
- Cardstock
- Paper bag(s)
The How
[row] [span columns=”5″] [/span] [span columns=”5″]Step 1:
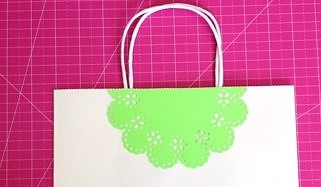
Apply your circle edge punch to your cardstock. The result will look like a paper doily. Magic, right?
[/span] [/row][row] [span columns=”5″] [/span] [span columns=”5″]
Step 2:
Cut your “doily” into 2 equal portions. You will use each of them for the front and back of the bag.
[/span] [/row][row] [span columns=”5″] [/span] [span columns=”5″]
Step 3:
Stick each piece onto the top front and top back as shown.
[/span] [/row][row] [span columns=”5″] [/span] [span columns=”5″]
Step 4:
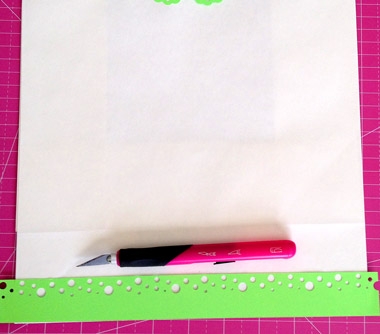
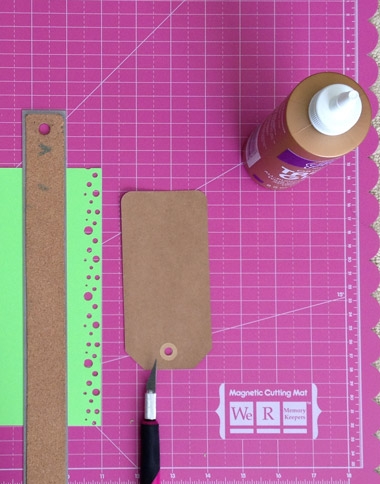
a. Use your border punch to create the strips for the bottom (front and back) of the bag.
b. Trim the edges so that the strips are the same length as the bottom of the bag.
c. Glue the strips to the front and back bottom edges of the bag
[/span] [/row][row] [span columns=”5″] [/span] [span columns=”5″]
Step 5:
a. Create 2 strips for the front and back (optional) for your tag.
b. Glue the strips onto your tag
[/span] [/row][row] [span columns=”5″] [/span] [span columns=”5″]
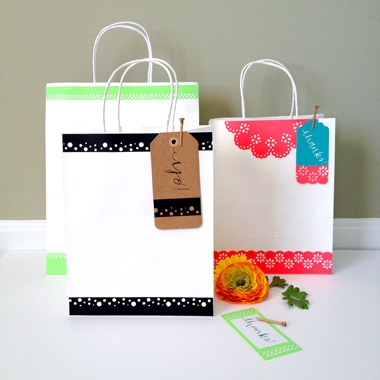
Yay! You now have a lovely matching gift bag and tag set for your next gift giving event. You can, of course vary it as shown in the top-most image. What will your gorgeous gift bags look like?
[/span] [/row]
7 Comments on DIY Gift Bags with Paper Punches
Comments are closed.



Howdy! I’m at work surfing around your blog from my new apple
iphone! Just wanted to say I love reading your blog and look forward to all your
posts! Keep up the fantastic work!
Thanks, Debra!
I every time spent my half an hour to read
this weblog’s content every day along with a cup of coffee.
Love your blog! You have such an amazing talent for making things beautiful – thanks for sharing it!
Thanks, Bella. Right back at ya!
I love this idea! You are so creative Maritza!
Thanks, Michelle! Glad you like it 🙂