Hello! I have a confession…. I….LOVE…PENS. Seriously. At any stage of my life, whether it was the week before school started, a new job, a new project – it was all about the new pen(s). Not the power suit, or the new lip gloss, or the new shoes. It was always about the cute fine (and extra fine) point writing instruments that made me jumpy-clap the night before the major event.
Imagine my joy as I spotted pens with white ink in the pen aisle. Friends, there are many varieties, and I’m almost on my way to testing them all (and may blog about them too!), but my absolute favorite thus far is the Sakura White Gel Ink Pen. They come in a pack of 3. The packaging says it’s medium point, but to me it feels more like a fine-medium. The ink is bright and shows beautifully on dark card stock. The key is to test it out on a piece of scrap to get the ink flowing. Write slowly for best results.
Whether you print, join your letters or dabble with lettering, white ink just makes everything look that much more yummy. Want to try it out? A quickie project below…
The What
[row] [span columns=”6″][/span] [span columns=”6″]
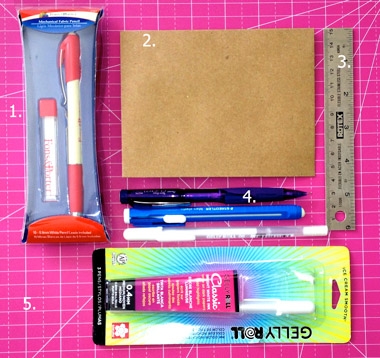
- White fabric chalk pencil. The one shown is from Fons & Porter. Why, you ask? It easily erases. This is not a must-have. If you do not have a chalk pencil, you can use a regular pencil. I’m just insane when it comes to writing
- A dark “anything” to write on. I used a Kraft (brown) envelope
- A ruler
- Pencil (if you do not have a chalk pencil), eraser, pen
- Cutting mat (optional but fun to have)
[/row]
The How
[row] [span columns=”6″] [/span] [span columns=”6″]Step 1:
With your (chalk or regular) pencil and ruler, draw your guide lines. If you are using a regular pencil, draw the lines lightly
[/span] [/row][row] [span columns=”6″] [/span] [span columns=”6″]
Step 2:
Use your pencil to produce a draft. I like to do this to get a sense of spacing
[/span] [/row][row] [span columns=”6″]
Step 3:
Write slowly with your white gel pen. Let your lovely letters dry for 5-10 minutes, then erase the pencil marks
[/span] [/row]and Done!
You can try your hand at anything – tags, cards, you name it!
7 Comments on Pen Love – have you tried a white gel pen?
Comments are closed.


Love this Mitzi. Have to see if we have these white gel pens in Trini. ❤️
Thanks, Aimee! Do you remember when we tested each other pens in Bishop’s?
Yes I love the white gel pens myself, I use them to outline my cards with dashes or add a pop to sentiments too. I agree, you should get sponsorship from the stores. 😉 Lovely handwriting btw..
Aren’t they great? I’m always looking for an excuse to write with mine. I’ve been using them a lot to address my envelopes. Thanks again – you (and my Mom) are very kind!!
I love this. The lettering is truly a work of art. It is simple and easy to do. The stores mentioned in your project should sponsor you for free advertisement. Love it all. I look forward to your next project. Well done…again!
Spoken like a true Mom. Thanks, Momma 🙂