
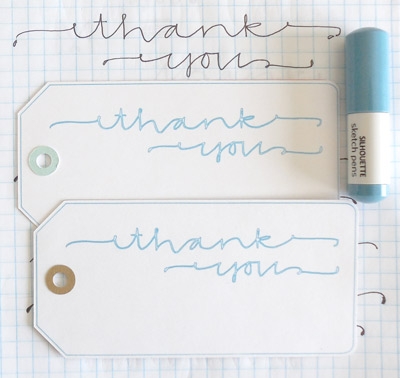
You know about my love for pens and lettering, right? Okay, so let’s build on the tags we made from this post to a whole ‘nother level. The Silhouette Cameo has the capability to use pens instead of a blade, so instead of the image being cut, you can direct it to draw your art or lovely letters. You can use a gel pen with the pen holder or one of the Silhouette Pens. I’m obsessed with the white Silhouette pen (surprise, surprise), but the ink ran out and I just ordered this new pack. Today we will focus on adding a sentiment to your tags using the Silhouette Pen.
The What
- Silhouette cutting machine
- Silhouette Studio
- Blade
- Cutting Mat
- Cardstock
- The template from this post
- A Silhouette Sketch Pen
- Sentiment (by hand or font)
- Glue or Sticker Machine
The How
[row]
[span columns=”5″]
Step 1:
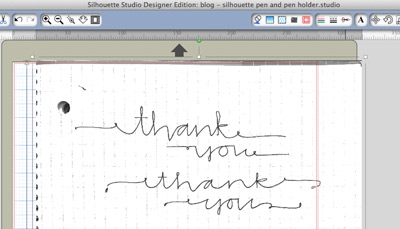
- If you are using a hand-written sentiment, scan or take a digital picture of it, then save to your computer. Tip: use in black ink – it makes an easier trace
- Open up your template .studio file from this post, and save as a new file
Step 2:
- Select File>Merge to add your sentiment image (from Step 1) to the new tag file
[/span]
[span columns=”7″]
[/span]
[/row]
[row]
[span columns=”5″]
Step 3:
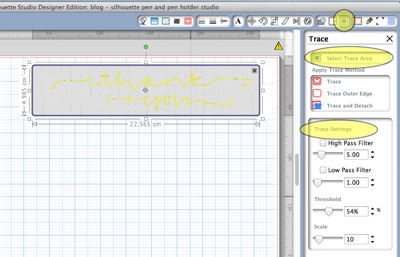
- Use the Trace tool to trace over your hand-written sentiment. You should now have an outlined version of your image
- If you are not using an image, use the Text tool to type your words
[/span]
[span columns=”7″]
[/span]
[/row]
[row]
[span columns=”5″]
Step 4:
- Resize and place your image on the tags
- To create a border, select your tag and create an internal offset.
- If you want to remove the outer circle that is created, select the internal offset image, then Object>Release Compound Path. Select the outer circle and delete.
[/span]
[span columns=”7″]

[/span]
[/row]
[row]
[span columns=”5″]
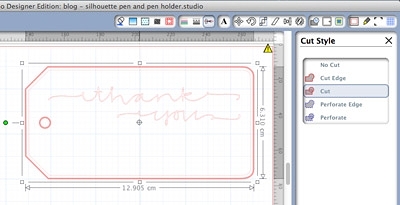
Step 5:
- Select the entire tag (including the internal offset and your text/sentiment)
- Use the Cut Style window to Select No Cut
- Now select only the internal offset and your text/sentiment and set to Cut. We have now set the pen to draw this selection
[/span]
[span columns=”7″]

[/span]
[/row]
[row]
[span columns=”5″]
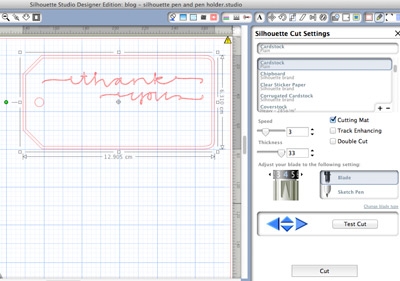
Step 6:
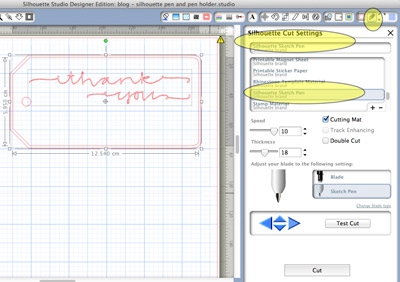
- Go to the Silhouette Cut Settings Window and select the Silhouette Sketch Pen
- Load your cardstock onto the cutting mat and Silhouette Cameo
- Replace your blade with the Silhouette pen
- Select Cut
- Once the pen stops writing, do not unload your mat and cardstock, just replace the Silhouette Pen with the blade
[/span]
[span columns=”7″]
[/span]
[/row]
Step 7:
- Now go back to the Cut Style window and only select the outer tag and hole. Select Cut.
- Change your Silhouette Cut Settings to Cardstock, and select Cut
- Cut out your hole borders, assemble and your set! If you want a sturdier tag, double them up. I usually do these in multiples and stash them away for the next set of thank-you gifts. Enjoy your tags!

Looking for some more inspiration? Check out my other Silhouette CAMEO tutorials.
Is the Thank You a downloadable font?
Hi Nancy – Actually, it’s not a downloadable font (I’m flattered that you think it is!). The tutorial is based on using your own lettering.
My question is similar to the above. I’d like to pull up a tag from the Silhouette store and be able to print a sentiment on it before I print it. Is that possible? J
Yes, it should be. Download the tag shape, then use the text tool to write your sentiment.
Hello! This is such a clear tutorial. I am totally new to the Cameo that I just opened the box yesterday. I am wondering if you can help me
a question. I am planning to make about 150 tags for a Sweet Sixteen Party. Is it possible to print out my labels and save them on a flash drive and print it out in Staples or Kinkos then cut them out using my Cameo? I just find that their
Laser printer is way better than
My inkjet. Thanks a lot!
Hi Lyn! Thank you! Congrats on your new Silhouette – I hope you have as much fun with it as I do with mine! In terms of sending it to print professionally, I can’t give you a yes or no as I have not tried that before. For the print and cut feature, you need the Silhouette software to print out the registration marks so that it can cut your tags accurately over your images/text. You can always guess, but I would hate for your cuts to be off. I would suggest you submit your question to Silhouette Plus (http://s15.zetaboards.com/Silhouette_Plus/index/) – it’s a forum dedicated to all things Silhouette. Good luck! Let me know how it goes!
Maritza